

Thank you for joining the Regenerative Revolution and for supporting a Canadian company along with our Canadian manufacturers.
Installing NUAGE Vertical Planter
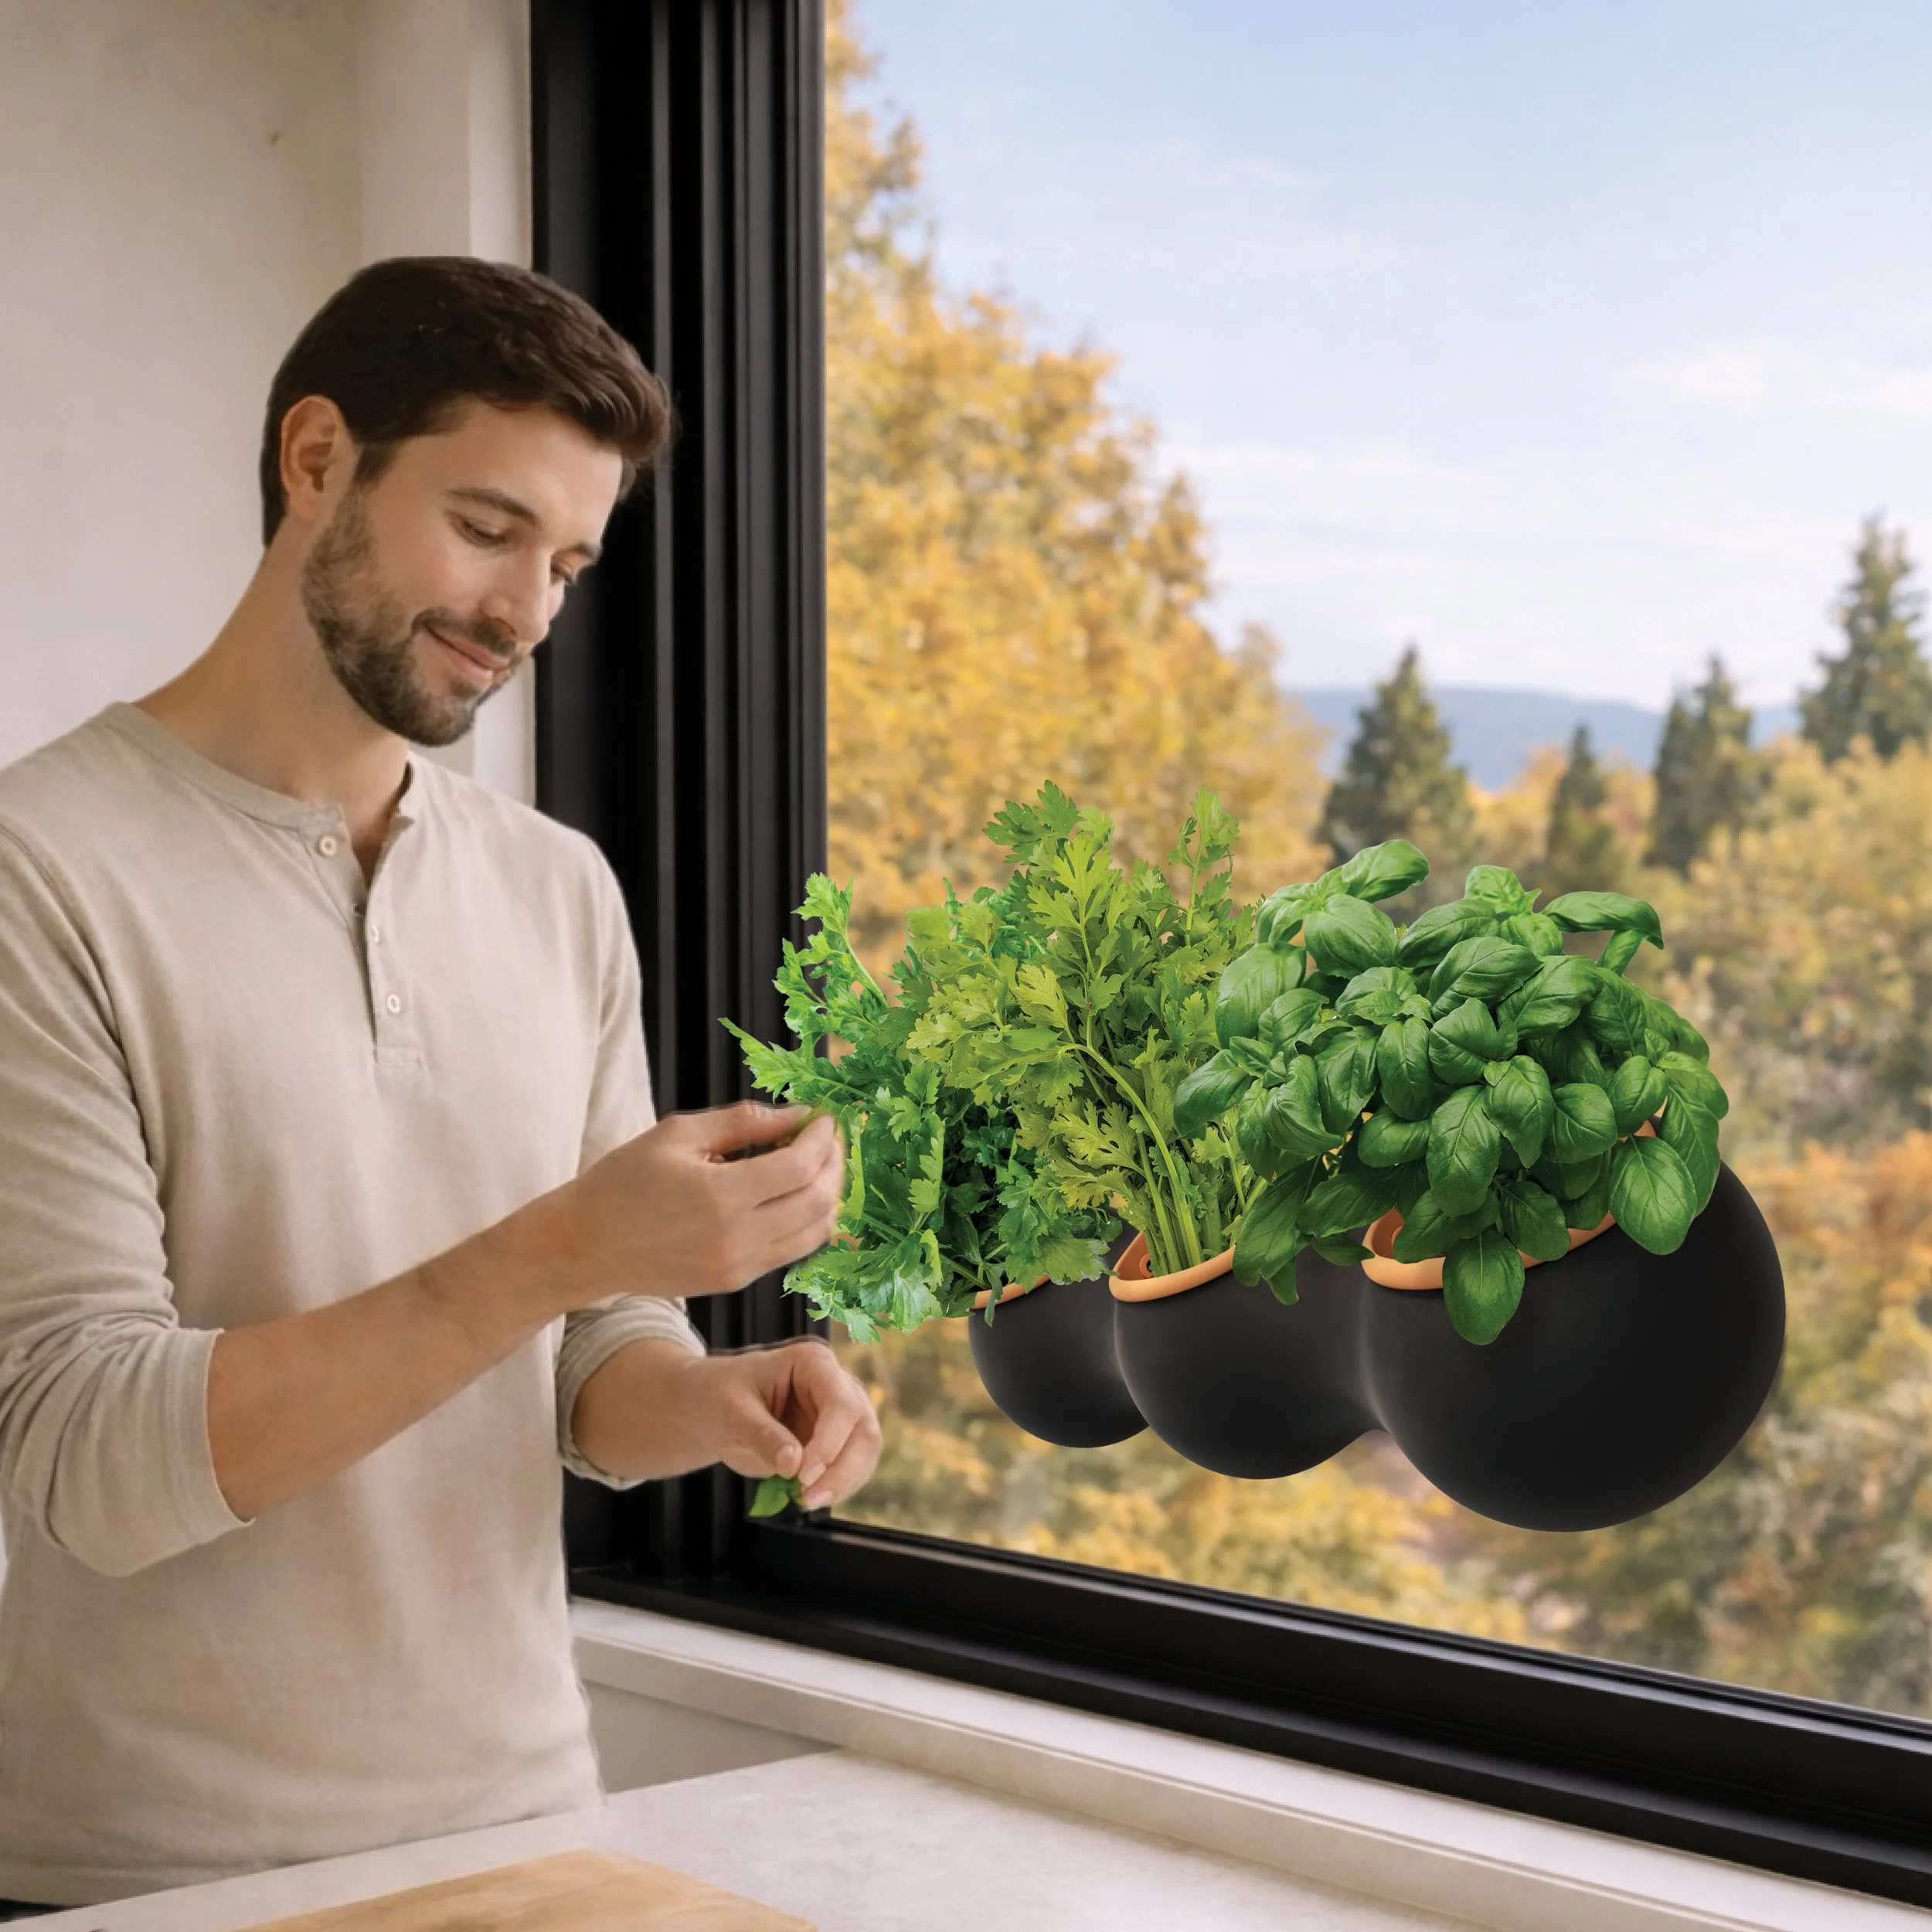
NUAGE can be installed on walls, tiles, windows, and railings. Its plant-led, on-demand irrigation system makes it ideal for both indoor and outdoor use in sheltered areas, while also performing beautifully in outdoor settings exposed to the elements during the dryer season.

install
Ensure that the wall can support 10kg (22.5lbs).
Draw a horizontal line on the wall with a pencil and level.
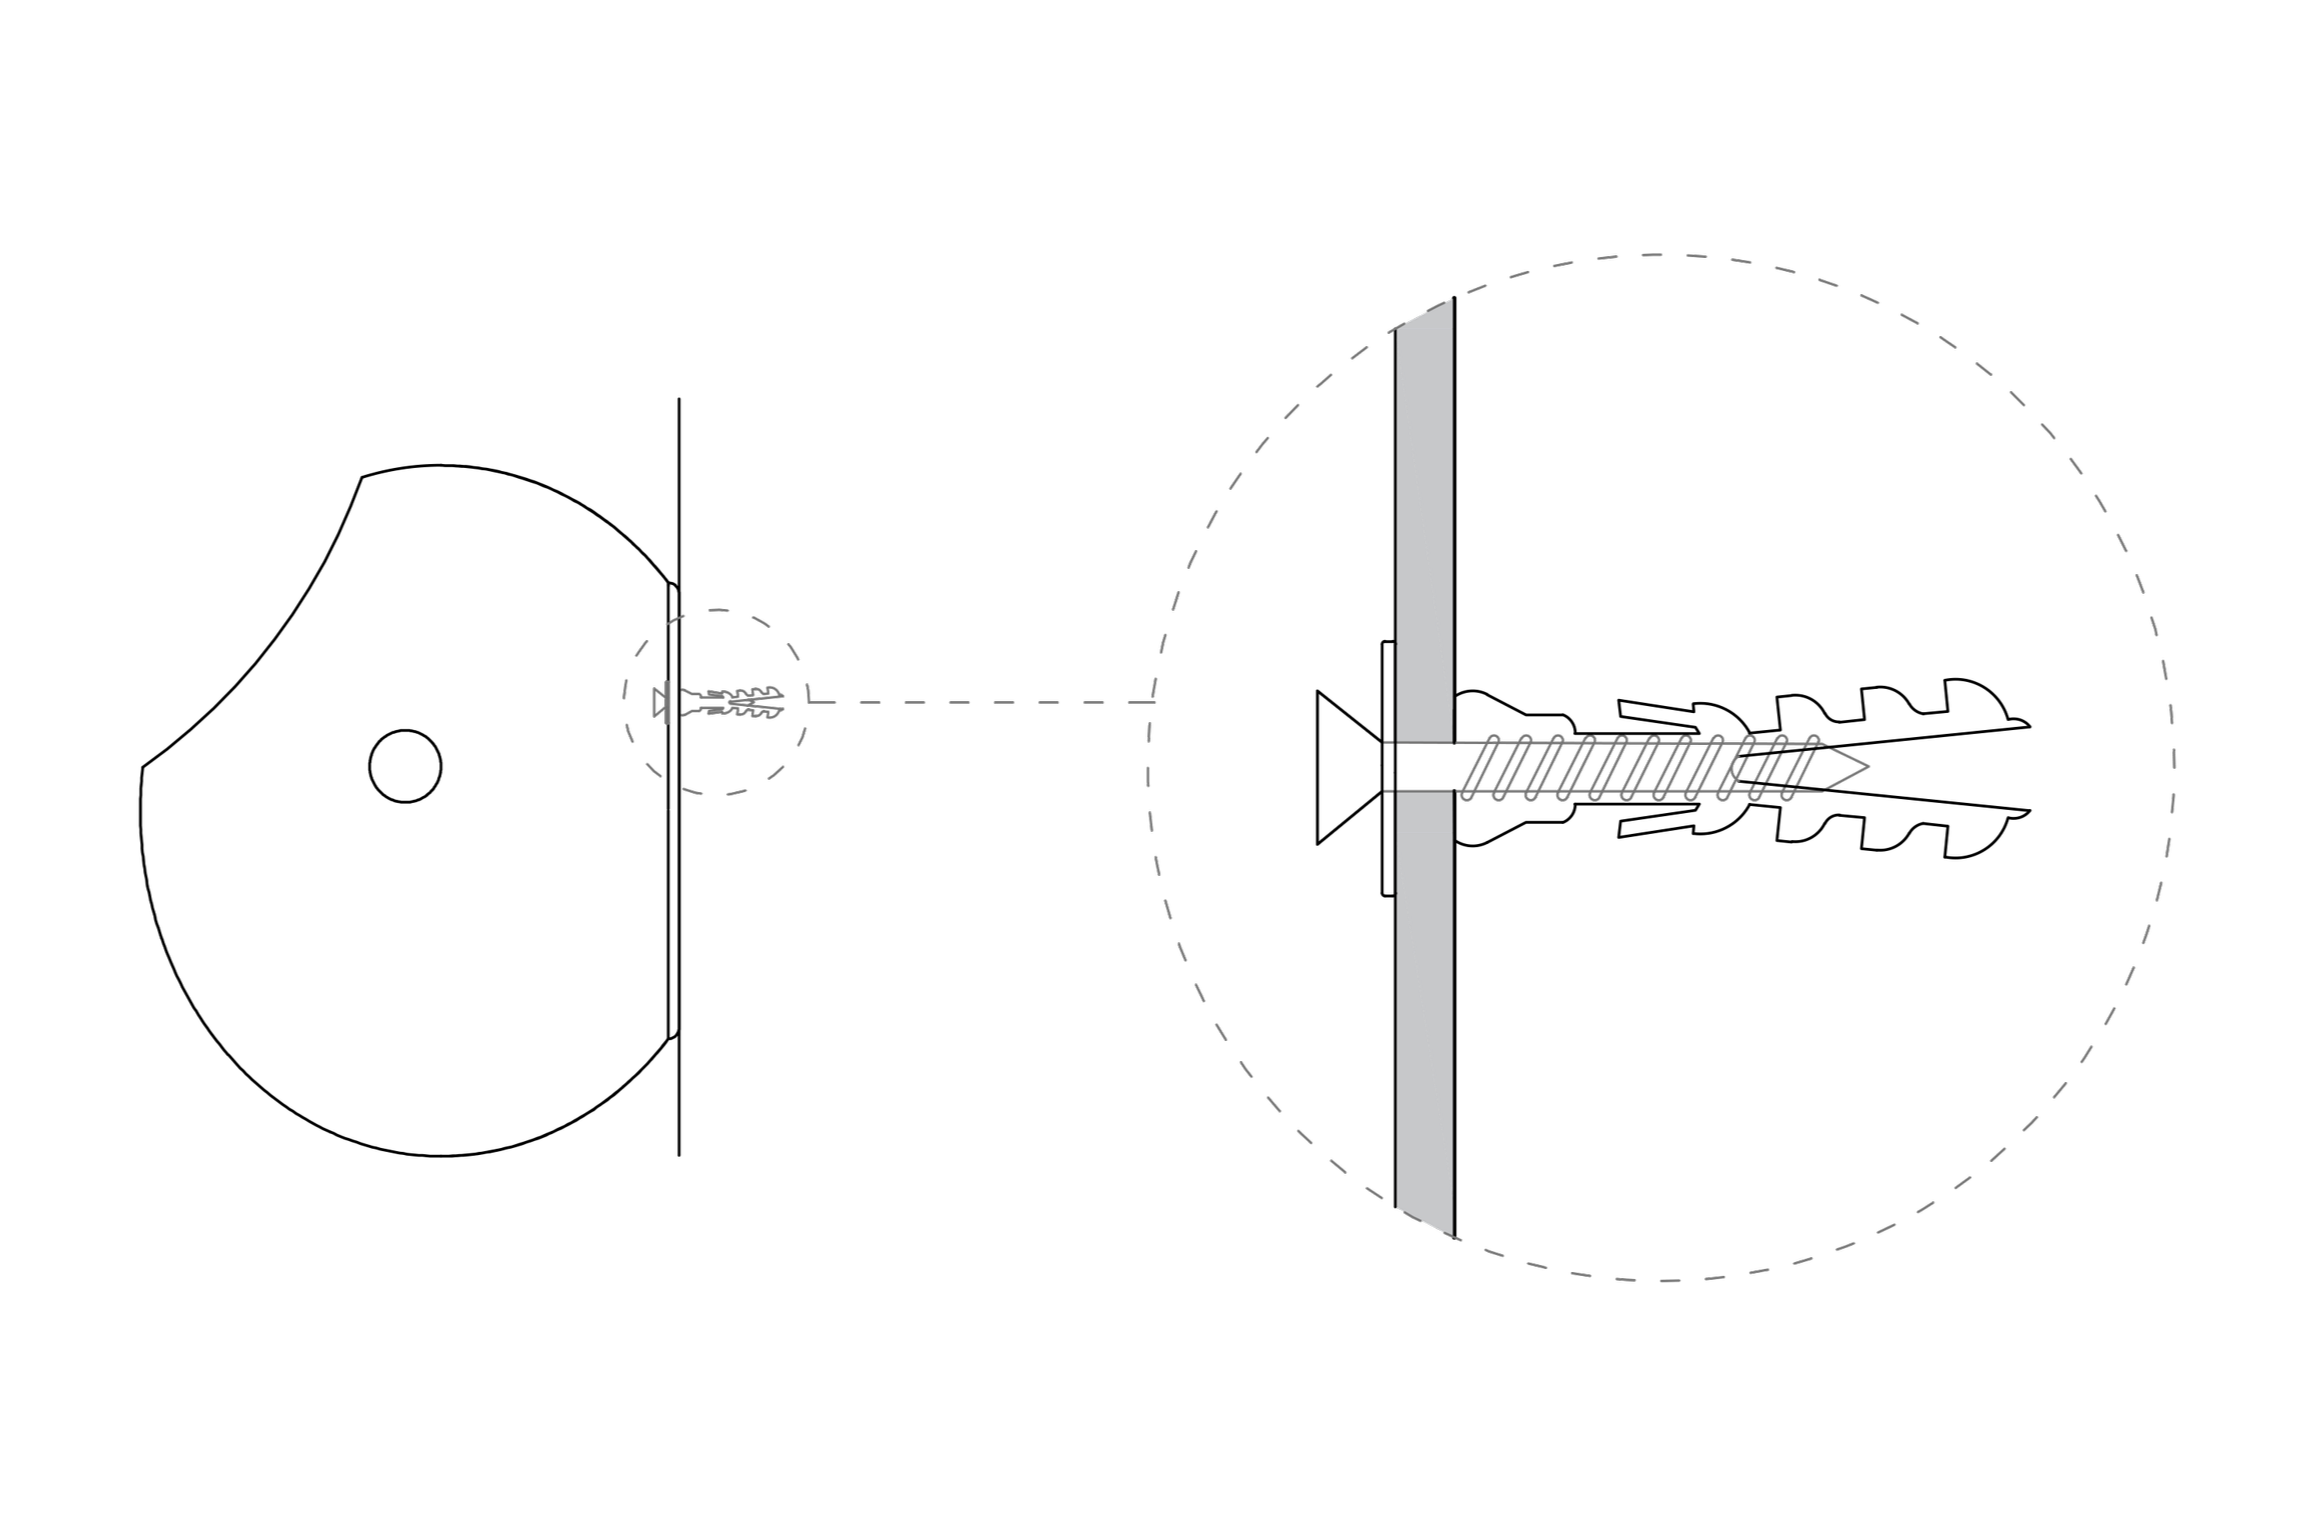
Mark the 3 anchor points (red dots) using the perforated template on the back of the packaging.
Place the tip of the anchor on the mark.
Using a Phillips screwdriver, turn clockwise and
press gently. The anchor drills itself into the drywall. Keep turning until the anchor sits flat against the wall. Stop when flush. Do not overtighten.Insert the screw through the rubberized washer making sure the stainless steel side faces you. Insert screw and washer into middle screw hole within the reservoir.
Lift the reservoir into place and screw into the midddle anchor. Tighten gently then rotate the reservoir until aligned perfectly with the two side anchors.
Repeat for the 2 remaining anchors.
assemble
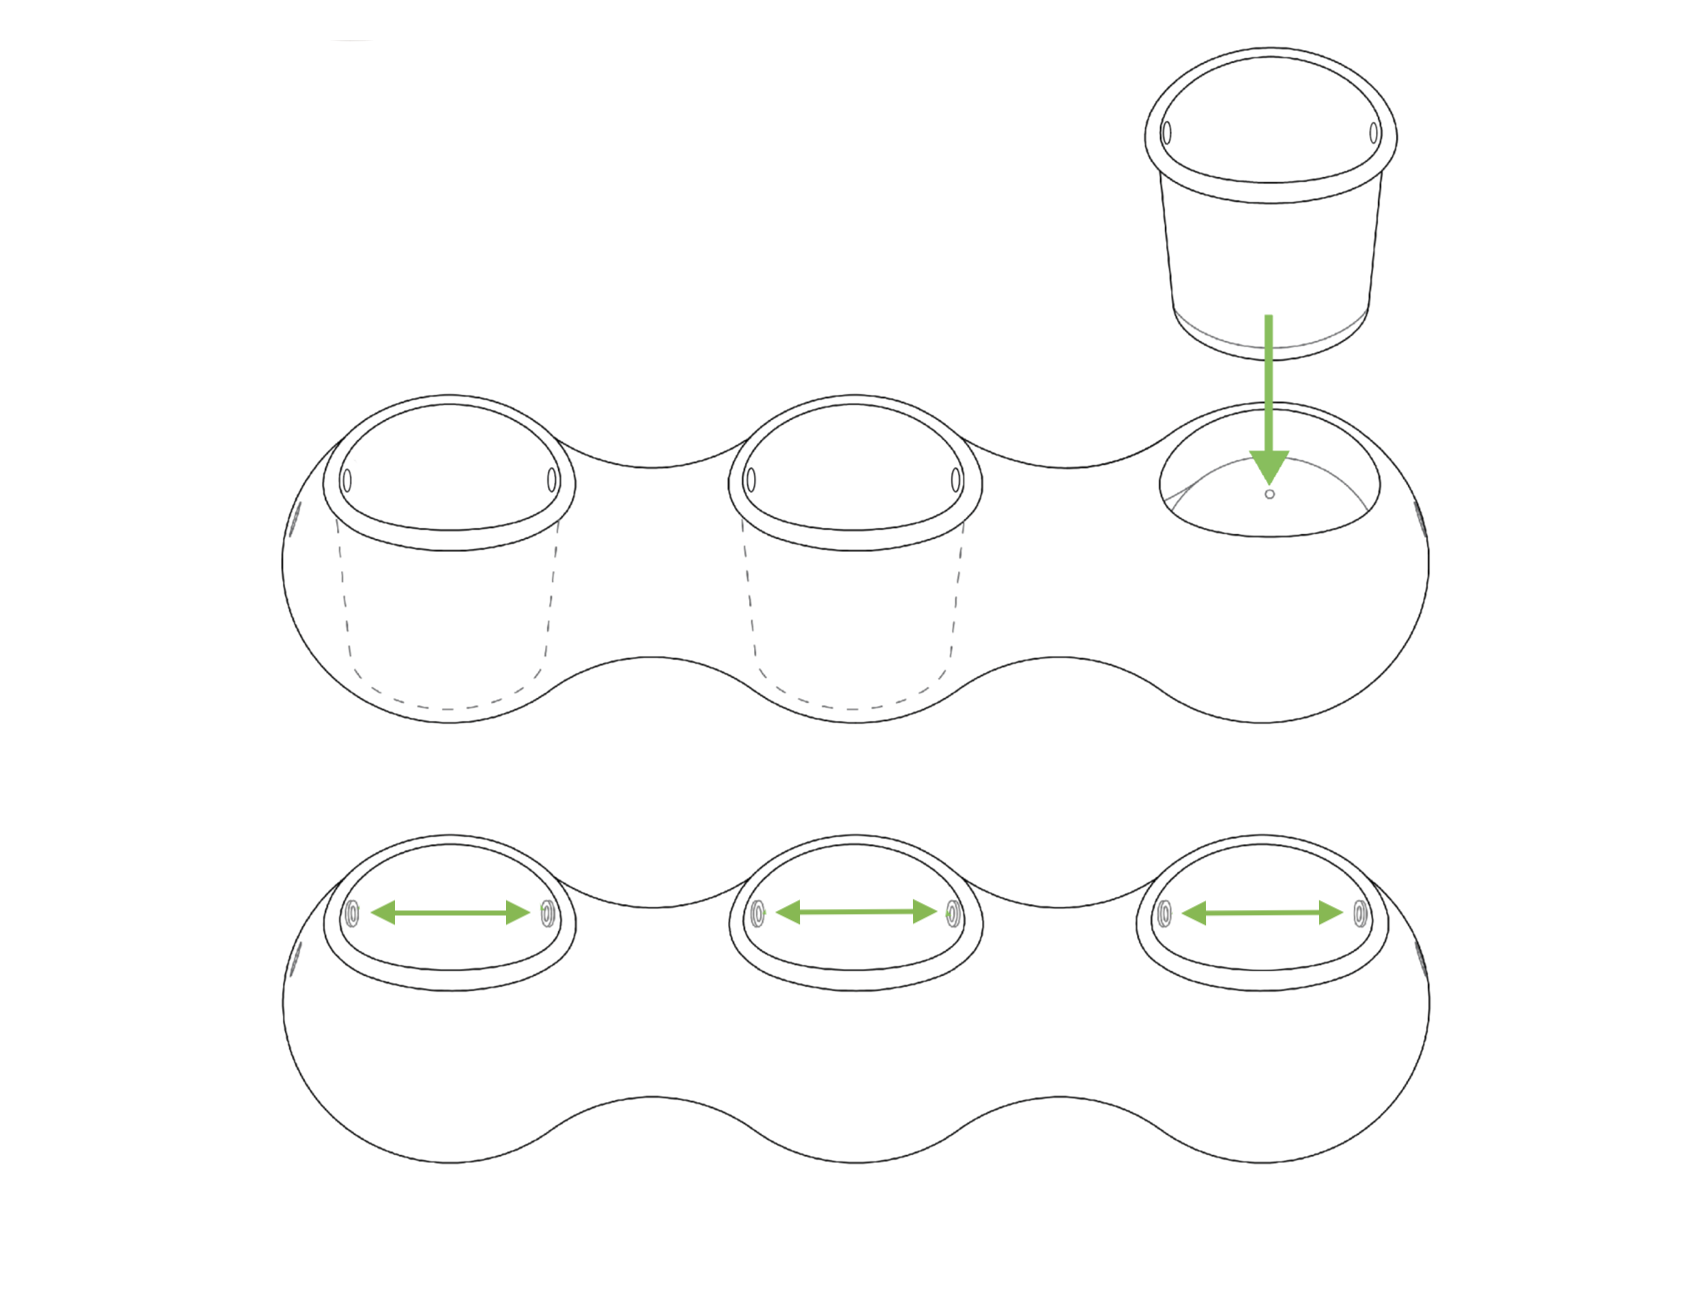
1. Once the water reservoir has been mounted on the wall, place each pot inside the 3 openings.
2. Push the silicone grommets into the openings on either side of each pot to secure them in place. Inserting them at a slight downward angle makes the process easier.
set up wick
Make a knot at the centre of the wick. For very small plants, or plants that prefer less moisture such as succulents, you may add a second knot to further reduce water flow.

2. Using the bamboo skewer, gently push the wick through the silicone sleeve.
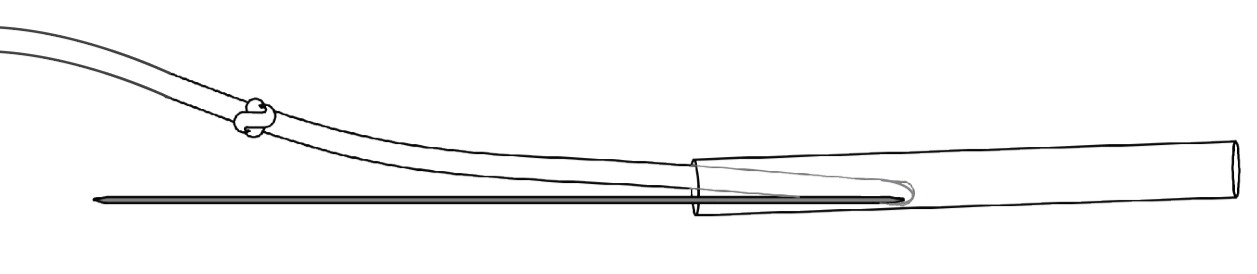
3. Once the wick emerges from the end of the sleeve, gently pull it through until it is properly positioned.

adjust irrigation
Welcome to a highly water-efficient irrigation system designed to provide up to one month of autonomy.
This innovative system creates a natural capillary connection between the plant, the wick, and the growing medium—allowing for precise, responsive hydration. Fine-tuning is part of the process, so it’s important to avoid overwatering.
Take a mindful moment to connect with your plants and observe their unique rhythm. Each one responds differently depending on light, location, size, and species. As your plants settle in, their roots will gradually grow toward the reservoir—this gentle calibration can take a few weeks as your system finds its natural balance.
To adjust the watering level, simply slide the knot(s) up or down within the silicone sleeve:
Higher knot = less water released
Lower knot = more water released
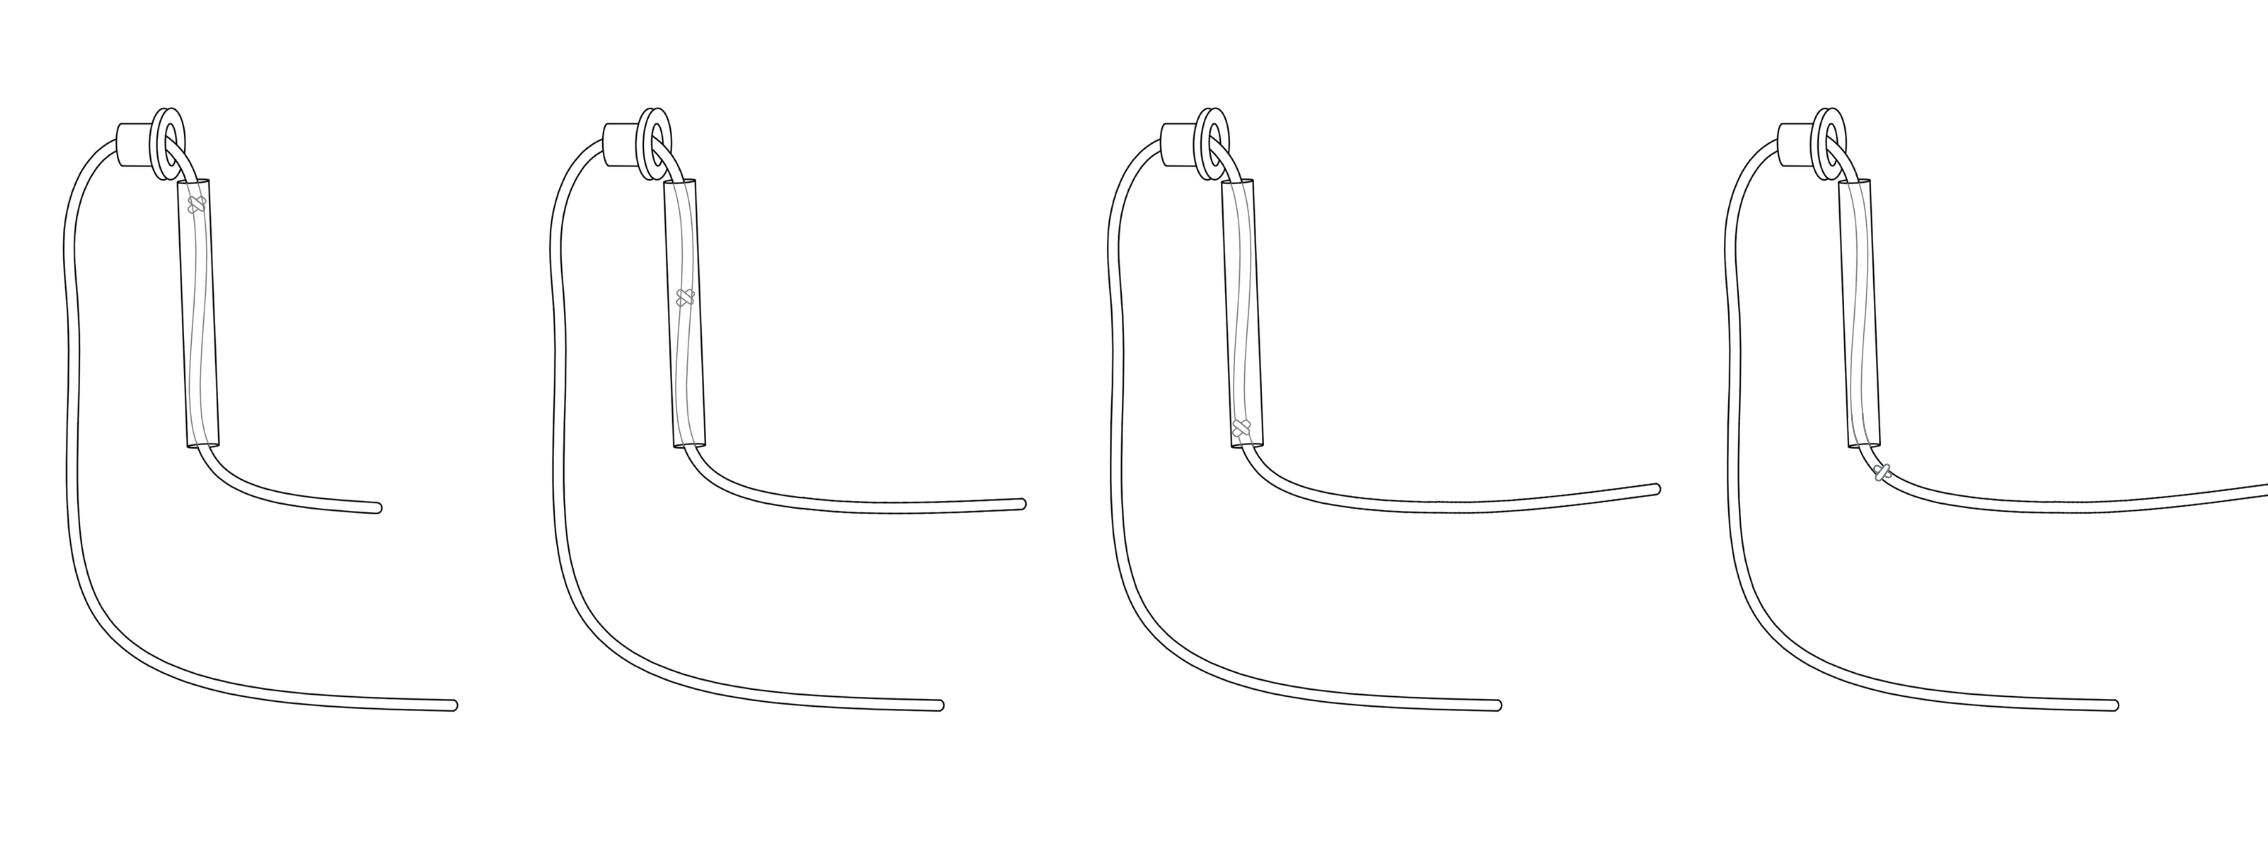
less water more water
To fine-tune this adjustment, simply pull the silicone sleeve upwards, then adjust the wick by pulling it up (for less water) or down (for more water). Once adjusted, gently push the silicone sleeve back into the pot, ensuring that the top of the silicone sleeve remains above the growing medium.
Please keep in mind that as sunlight intensity and temperatures increase, plant evapotranspiration will also rise. During warmer and sunnier periods, you may wish to increase the water flow accordingly.
install wick
Weave one wick per pot through one of the side silicone grommets, ensuring there is enough length for the wick to reach the bottom of the water reservoir. Always make sure that the top of the silicone sleeve is above the soil level.
Please avoid using the grommets at either end of the water reservoir, as there is less space for the wick to slide freely.

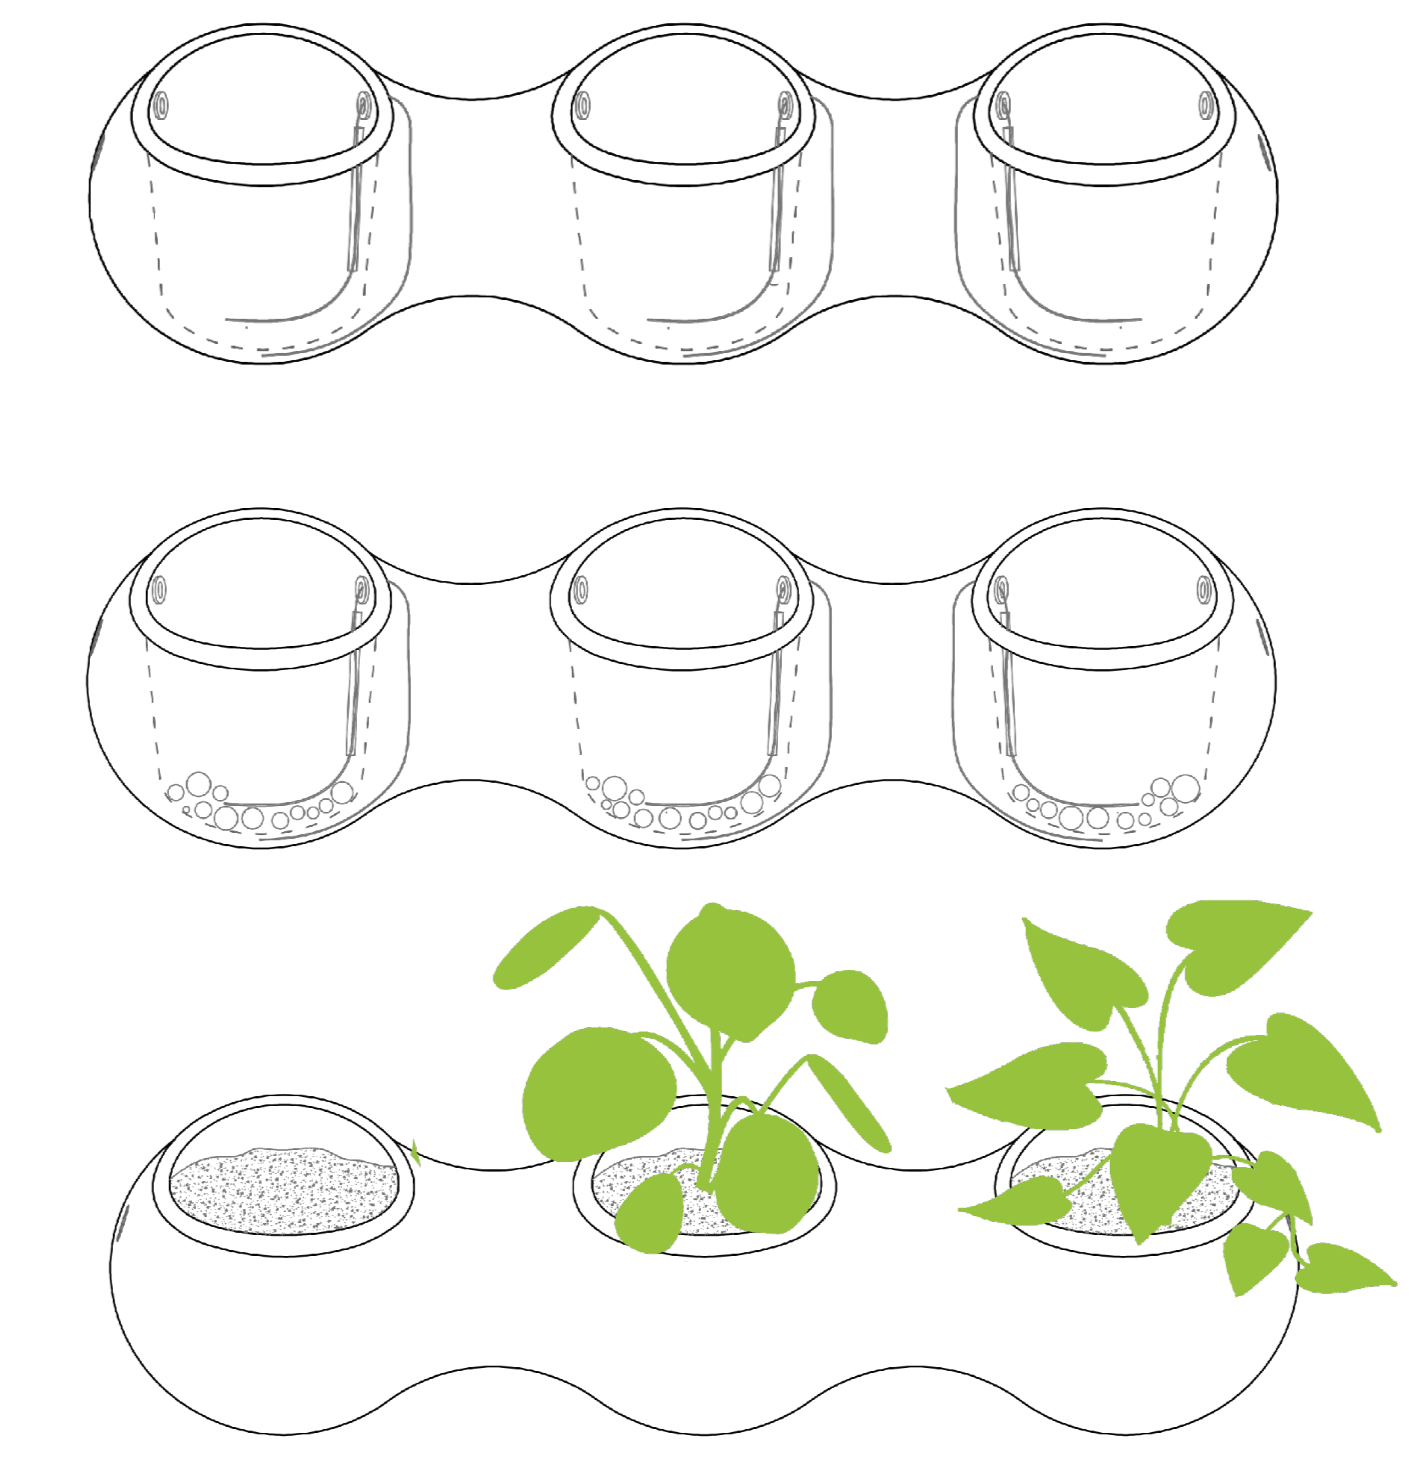
plant
As you add the growing medium and place your plants, take a moment to settle them in thoughtfully:
Guide the wick and its silicone sleeve vertically along one side of the pot
Lay the wick softly along the base, creating a natural path for water to rise through capillary action
Fill carefully to avoid any air pockets around the roots
For best results, we recommend using a growing medium adapted to the needs of your plants.
Herbs, leafy greens, strawberries, tropical plants, and most indoor ornamentals thrive in airy mixes that retain some moisture while still allowing oxygen to reach the roots. A balanced organic potting works beautifully for most applications.
Plants that prefer drier conditions—such as rosemary, thyme, succulents, or Mediterranean herbs—benefit from a more mineral-based and fast-draining mix with additional pumice or perlite incorporated throughout the soil.
Plants that enjoy more consistent moisture—such as basil, leafy greens, mint, ferns, or many tropical species—can be grown in richer organic mixes containing coco coir or compost, while still maintaining good aeration.
If your soil tends to retain a large amount of moisture, it may naturally draw more water than required through the wick system. In this case, blending additional perlite or pumice into your growing medium—and adding clay pellets at the base—will help restore balance and prevent excess saturation.
Important: Keep the wick resting just above this drainage layer, allowing it to draw water naturally without over-saturating the roots.
planting multiple modules
When working with multiple NUAGE modules, begin at the top and move downward. This simple rhythm keeps your plants undisturbed and your process clean and fluid—like building a living wall, one layer at a time.
IMPORTANT STEP for New Plants
When installing new plants in your NUAGE system, begin by positioning the knot(s) at the top of the sleeve and watering directly into the soil at the time of planting. Be careful not to overwater.
Continue watering this way regularly until the roots have reached the bottom of the planter. This establishment phase typically takes approximately a few weeks, depending on the plant variety, growing conditions, and root development.
If the growing medium becomes too dry, gently pull the silicone sleeve straight upward and slide the knot slightly downward to increase water flow. Then guide the sleeve back into place, ensuring that any excess wick is pushed back through the grommet and that the top of the silicone sleeve remains above the growing medium.
During this time:
Keep the soil consistently moist, but never saturated
Water gently into the pot to prevent dehydration and encourage roots to grow downward
Allow the wick system to gradually become the plant’s primary water source
As the roots extend toward the base, they will naturally begin to access the reservoir through the wick. Fine rootlets will attach to the wick and start drawing water as needed.
Once fully established, you can fine-tune irrigation by adjusting the knot(s) along the silicone sleeve—raising it for less water, lowering it for more. Make sure the top of the wick and silicone sleeve always remain above the growing mix, as burying them could cause flooding.
At this point, care becomes beautifully simple—your plants transition into NUAGE’s self-regulating, low-maintenance rhythm.
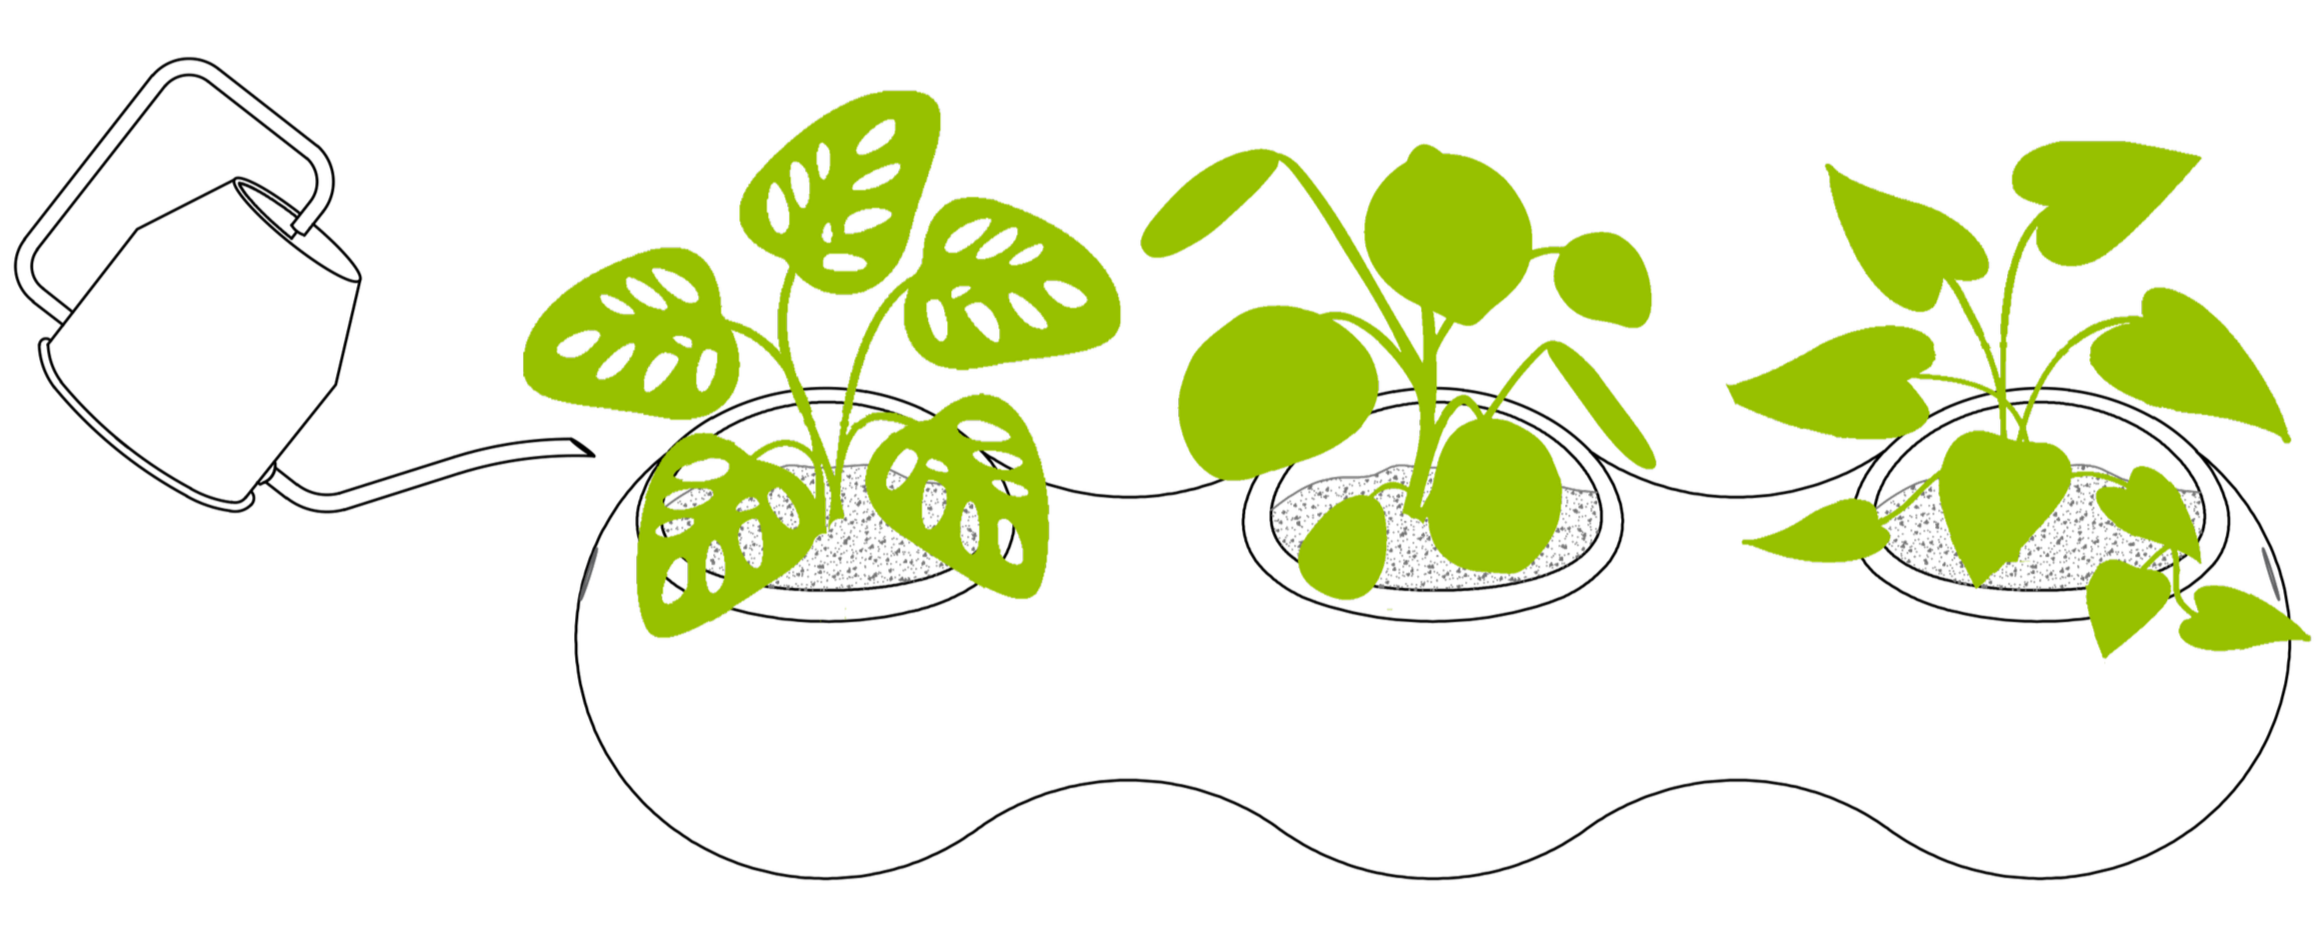
fill
To fill the water reservoir, simply pour water through either opening at the ends of the NUAGE module using a watering can or watering wand. You can check the water level by gently placing a finger into one of the small perforations on either side of the module.
For an empty reservoir, we recommend adding approximately 3 litres of water. We recommend adding ½ teaspoon of our kelp fertiliser to the irrigation water or any other water-soluble fertiliser.
Refill reservoir as needed.
After planting, take a few weeks to observe your plants and adjust their watering level as needed. Keep in mind that plant size, indoor temperature, ambient humidity, and sun vs. shade exposure will all influence how much moisture your plants prefer.
Begin with the recommended wick settings above, then adjust until each plant finds its happy equilibrium.
This simple, water-efficient system, with its subtle fine-tuning adjustments, mimics natural seasonal moisture cycles, encouraging roots to grow strong, resilient, and deeply anchored.
Mounting on Windows
To mount your NUAGE on a window, begin by screwing in the three suction cups into the 3 perforations at the back of the water reservoir. Add the washer to each crew inside the water reservoir, then secure in place with the nut.
To ensure proper alignment and stability, attach the 2 grey pads provided to the back of the reservoir on each side.
Once installed, gently press the unit against the glass to engage the suction cups.
We recommend mounting NUAGE³ with our ULTRA Suction Cups on double or triple-glazed insulated windows. Single-pane glass or surfaces that experience rapid temperature changes may cause the suction cups to release over time.
Please check periodically to ensure that the suction cups remain fully adhered to the glass.
Direct full sun exposure or dramatic temperature fluctuations (for example, very cold nights followed by strong daytime sun) may reduce suction performance.
Use at your discretion and install in locations appropriate for your space.
Caring for Plants
Fine-Tuning Moisture Levels
After planting, take a few days to observe your plants and adjust their watering level as needed. Keep in mind that plant size, indoor temperature, ambient humidity, and sun vs. shade exposure will all influence how much moisture your plants prefer.
Begin with the recommended wick settings below, then adjust slowly over a few days until each plant finds its happy equilibrium.
This simple, water-efficient system, with its subtle fine-tuning adjustments, mimics natural seasonal moisture cycles, encouraging roots to grow strong, resilient, and deeply anchored.
Seasonal Adjustments
Please remember to adjust the watering level as indoor light conditions, temperature, and humidity shift throughout the seasons.
Nourishment
Don’t forget to feed your plants! Insert one organic fertilizer stick per pod once a month, or add a few drops of organic liquid fertilizer into the water reservoir.
Selecting Plants
Whether you're curating a lush corner, greening your workspace, growing your kitchen herb garden or designing a vertical garden, choosing the right plants for 6-inch indoor pots requires balancing aesthetics, care needs, and environmental conditions.
Light Requirements
Choose plants based on the natural light available in your space:
Bright, direct light: Succulents, jade plant, snake plant, ponytail palm
Bright, indirect light: Pothos, philodendron, calathea, spider plant, peace lily
Low light: ZZ plant, Chinese evergreen, cast iron plant
Tip: South- and west-facing windows offer more intense light, while north-facing ones suit shade-lovers.
Growth Habit
Compact or slow-growing: Perfect for long-term container life
Trailing or cascading: Ideal for hanging displays or vertical walls
Upright and bushy: Great for filling visual space (e.g., peperomia, ferns)
Root System & Pot Depth
Shallow to medium root systems (avoid fast-growing plants that quickly become root-bound)
Examples: Fittonia, peperomia, maranta, small ferns, air-purifying climbers
Avoid large root vegetables or vigorous tropicals that outgrow small containers quickly.
Care Level
Match the plant to your lifestyle and watering habits:
Low-maintenance: Snake plant, ZZ plant, pothos
Moderate care: Calathea, prayer plant, ferns
Humidity lovers: Baby tears, Boston fern, mosses — great near kitchens or bathrooms
Air Purification & Wellness
Many small plants also purify the air and boost well-being:
Best choices: Peace lily, pothos, spider plant, Chinese evergreen
Edibles & Aromatics
Want Fresh Greens?
Herbs: Basil, Parsley, Cilantro (bright light required)
Microgreens, Sprouts & baby greens: Quick harvest and replant cycles
Aesthetic Considerations
Choose leaf texture and color to create visual contrast (e.g., glossy vs. velvety, variegated vs. solid)
Mix heights and shapes to add dimension
Use themed palettes: tropical lush, desert chic, soft pastels, or bold greens
“Regenerative design invites us to live in harmony with nature — creating relationships that nurture both people and planet.”
Geneviève Noël

“Circularity speaks not only to a biomimetic form, but also to a regenerative design philosophy — one in which waste is simply an output awaiting its next purpose. Instead of plastic waste congesting our oceans, NUAGE up-cycles it into a beautiful life affirming product.”
Maginnis Cocivera
